
About Custom Cellars-Experts in the Industry since 2003
Custom Cellars started as a craft business supplying wine enthusiasts with specialized wine cabinets and custom wine cellaring spaces. Fast-forward almost 20 years, and we are now one of North America’s leading suppliers of wine cellar hardware. In 2009, Custom Cellars opened Wine Cellar Depot (www.winecellardepot.com), supplying builders, designers, and millwork shops with the expert advice and quality hardware needed to create outstanding wine rooms. Our deep experience in this field provides incredible product knowledge matched with real-world experience with best practices. Our team is continuously learning and upgrading skills, so we can offer you trusted advice.
Wine Cellar Depot’s practical and deep knowledge built through years of supplying cooling systems and wine racks is the perfect complement to Custom Cellars’ creativity and passion for custom design. Voted Best of Houzz on numerous occasions, Custom Cellars is your premier choice to create the wine cellar of your dreams.
Wondering how to build a wine cellar? You are in the right place!
Learning how to build a wine cellar to age and enjoy fine wines is likely one of the most interesting projects you’ll embark on, and a vital part of the construction or renovation of your home. Proper construction practices are key to your journey’s success.
Let’s start with this wonderful video showing you how to build a wine cellar, produced by Wine Guardian, one of our trusted partners, in climate control.
View Video by Wine Guardian
Framing Your Wine Cellar
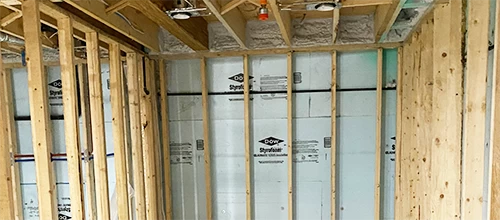
If you can, start with 2 x 6 framing for your wine room. In turn, this ensures the highest level of R Value for your cellar. Specifically, the R value is your room’s thermal resistance to heat flowing in to or cold out of your cellar. The higher this thermal mass, the better it is for keeping your wines cold and your energy bills low. It protects against pesky power outages as well! 2 x 4 construction is common and works well too. A well-versed cellar contractor will calculate the BTU needed to cool your space, based on the various factors and size the cooling system accordingly. We can help. Please call us at 866-901-9463.
Vapor Barrier and Insulation
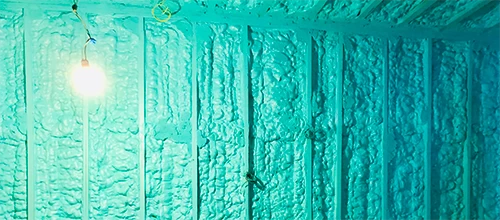
Please note, the importance of a vapor barrier when understanding how to build a wine cellar, should never be understated. First, wrap your vapor barrier around the joists and wall framing, if it cannot be installed first on the outside and tipped into place. Secondly, it is always on the warm side of your cellar. However, in the case of exterior foundation walls, a vapor barrier on both sides is prudent with a 1 inch gap between the walls for air circulation. Thirdly, we recommend 6 mil. poly or closed cell foam (which acts as both vapor barrier and insulation). Then, seams are overlapped and taped. Finally, your goal is to seal the room like a zip-lock bag!
Why a vapor barrier?
First, it prevents condensation from forming on the barrier and wetting the insulation that is beside it. Always, make sure you pay close attention to this because it’s a detail that often gets overlooked. Specifically, it gets overlooked because everyone is very accustomed to seeing the poly on the walls in the room. Moreover, it should be behind your insulation, so please keep that in mind. Furthermore, the vapor barrier helps to keep the humidity in your cellar under control. Lastly, without it, you have a “wild card” trying to manage percentages of 50-70% relative humidity. Not to mention, your cooling system will have far longer run times and eventually, a reduced lifespan.
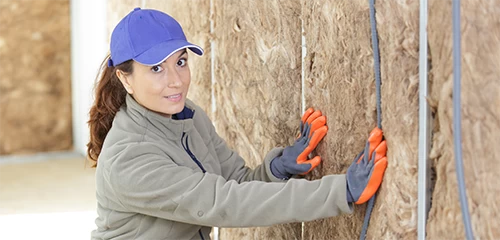
Insulation
Importantly, insulation must be 3.5-6” and producing a minimum of R12 in your walls. Normally, in a perfect world, we aim for R20 in the walls and R28 in the ceiling. For one thing, this conserves energy and protects against heat fluctuations. Also, it ensures stable temperatures, and then extends the lifespan of your valuable cooling system.
Upper or Lower Floor
Specifically, if your cellar is located on an upper floor, remember to insulate your floor as well. Often, this is missed and a potential for cooling loss. Alternatively, if in the basement, seal the concrete to protect any potential moisture from interfering with the cooling system’s management of the climate.
Similarly, radiant heat is another sneaky culprit in challenging your cooling system. So, be sure to run a thermal break around the perimeter of the cellar to avoid any “creep” of heat to the cold floor. Lastly, even 12” away is an issue as heat migrates to cold in concrete. For this reason, I highlighted ‘thermal break”…it is very important! In conclusion, we want to protect your investment in the cooling system!
Location and Climate Conditions
Basement
Ideally, locate your wine cellar in a basement, below ground level. In this case, the basement provides a naturally cool space, giving your cooling system an easier workload. It also protects against UV light. Avoid UV from windows or direct sunlight, accessing your cellar. UV can create a condition called “light-struck” which alters the state of your wines, bringing aromas of onion and burnt rubber.
Main Floor
If you are placing your cellar on a main floor or upstairs, don’t worry. This has become very popular as people build extraordinary wine rooms which are focal points in their homes. Regardless of the location in your home, there is always a cooling solution. Most importantly, make sure your cellar professional is aware of the location, when calculating the BTU for the cellar, and planning the cooling system. If we are aware of your plans, we can work around environmental situations and choose the perfect system and construction materials.
We can lend some advice on how to build a wine cellar that you will love for years to come. Aim for storage temperatures of 12-13C or 55-56F. This is ideal for aging and brings out the beauty the winemaker intended.
Vibrations
Lastly, vibrations can play a part in the aging process, altering the chemical composition of your wines, its flavor and aromas. Media rooms, if they are frequented often, mechanical rooms, and heaters of all sorts, can cause vibrations and affect your wines. Always think of conditions like a cave: little to no UV light, relative humidity levels between 50-70%, cool temperatures and no vibrations!
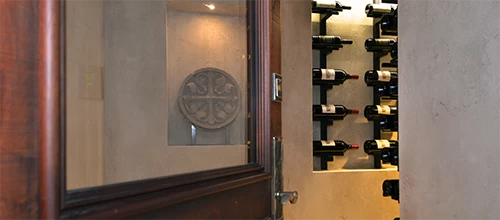
Materials
First, choose your glass and doors carefully. Single paned, frameless glass walls and doors are a staple in our everyday cellar construction. Years ago, we practically refused to build these types of wine rooms. Now, with the strong influence of designers in home construction, the envelope has been pushed and to be honest, we are very grateful for it! Today’s cellars are GORGEOUS and our jobs are WAY MORE FUN.
Be sure the glass has mohair around all openings, to seal out as much adjacent, warm air as possible. Also, be sure you contact our friendly staff to do a free load calculation on your cellar. You want to be 100% sure you have the correct cooling system. As wine cellar experts, with over 20 years of experience, we are able to determine this for you.
Learning how to Build a Wine Cellar to perfection can brings years of worry free wine aging and joy.
In closing, we want you know how excited we are for you and your plans for a climate controlled wine cellar. It’s one of the most fun projects in your construction plans, bringing years of joy and rewards from a room well-built and potentially the focal point of your home. All the best and we look forward to helping you make this a reality. If you have any other questions about how to build a wine cellar please contact us.
Cheers!
The Team and Wine Cellar Depot